Sorry, had to reformat the first bit. It needed to be clearer.
Project 1: The Darkroom and Photograms -
What is a Darkroom?
A darkroom is a room used for developing photographs - made with photographic paper or film - where normal/white light is excluded and red lights are used instead.
The set up in a darkroom:
In a darkroom, enlargers are used instead of a camera. This is a projector that shines light down onto the photographic paper - so it can be exposed - and enlarges the negatives to create photograms. The enlarger includes a lens and a lamp, which exposes the paper. The safe light is essential in a darkroom, as it prevents the photographic paper from being exposed and ruined. This light is red, and is used instead of white light for visibility. Once the paper is exposed, it has to go through a series of chemicals for the image to develop.

These are darkroom trays; the first of which holds developer. The paper must be left in here for 1-2 minutes as you wash the liquid over it.
The second tray holds the 'stop' chemical. The developed photographic paper only has to be submerged in here for 30 seconds; as the chemical stops the paper from developing further.
The final tray is the 'fix' chemical which effectively stabilizes the image, and makes it insensitive to any further exposure to white light. Paper must be left in here for 3-4 minutes.
Lastly, the image is rinsed in a sink filled with water, to remove any excess chemicals before the paper is dried. Separate print tongs for each tray are used throughout to move the paper from each tray as it processes, to avoid any contamination between the chemicals and any damage from handling the paper directly.
|
What is a Photogram? A photogram is a photo made by laying objects on top of photographic paper, and exposing it to white light; causing the paper to react and create negative shapes/spaces. An example of setting up a photogram and the final image:

|

|
Test strips and prints:
A test strip is a series of exposures on a single piece of photographic paper, that is made to test the right amount of light required for a particular negative. It is important to make a test strip before you start creating your negatives, as you are then able to figure out the best amount of time to expose the paper, in order to produce the best image/s.
A test strip is a series of exposures on a single piece of photographic paper, that is made to test the right amount of light required for a particular negative. It is important to make a test strip before you start creating your negatives, as you are then able to figure out the best amount of time to expose the paper, in order to produce the best image/s.
How do you make a Test Strip?
To create a test strip, you take a piece of photographic paper, and place a piece of black card/cardboard over the top of it. You then hold both of these under the enlarger; set your aperture to the desired setting and set the timer to 2 seconds. Then, the cardboard is moved roughly 1 inch to the left, exposing a 'strip' of the photographic paper beneath it. This section of the paper is exposed for 2 seconds as the timer is set off. The process is repeated, moving the cardboard along and exposing an inch more of the paper each time. As a result, each strip of the photographic paper is exposed for 2 seconds longer than the last: so 2 seconds, 4 seconds, 6 seconds etc; until you reach the end of your paper. Then, you are able to select the best exposure from your test strips, and use this amount of time to expose your final images.
To create a test strip, you take a piece of photographic paper, and place a piece of black card/cardboard over the top of it. You then hold both of these under the enlarger; set your aperture to the desired setting and set the timer to 2 seconds. Then, the cardboard is moved roughly 1 inch to the left, exposing a 'strip' of the photographic paper beneath it. This section of the paper is exposed for 2 seconds as the timer is set off. The process is repeated, moving the cardboard along and exposing an inch more of the paper each time. As a result, each strip of the photographic paper is exposed for 2 seconds longer than the last: so 2 seconds, 4 seconds, 6 seconds etc; until you reach the end of your paper. Then, you are able to select the best exposure from your test strips, and use this amount of time to expose your final images.
|
Making a print once you have the right exposure time:
Once you have finished processing your test strip, and have selected the exposure you are going to use, you are ready to make your final image or images. To do this, you'd first set your timer to the amount of seconds that determine the best exposure. Then, place a new piece of photographic paper under the enlarger, making sure the emulsion side is facing upwards. Next, arrange your items/negatives on top of the paper, and expose this for the set amount of seconds. You will therefore produce a successful final image that is not too over or under exposed. |

|
Processes:

|
Painting with developer: To create this image, I placed my photographic paper under the enlarger, and arranged my items on top of it. I then exposed the paper for roughly 3 seconds, to create negatives. After my paper was exposed, I then moved to the tray of developer; and using a paintbrush, held my paper vertical to the floor, and allowed the chemicals to drip down it. I also tried 'splattering' and dripping the developer as well, to create different effects. This technique only partially allows the image to develop where the chemicals touch the paper, instead of submerging it all, like usual. As a result, you are left with an image that is black and white, with interesting shapes and patterns where the liquid has dripped over the page. |
|
Double exposure: To create this effect I repeated the same first steps as mentioned above, and allowed my paper to be exposed once with a first set of items. However, I then chose some new translucent items and arranged them over the same pre-exposed paper, and exposed it again for the same amount of time. After developing this image, you are left with a ghost like effect, where both sets of negatives can be seen overlapping each other. |

|

|
Moving an object: For this image, I laid out my photographic paper, and used an old cassette and also a pair of scissors. I first positioned the item near the left hand side of the paper, and exposed it for 1 and a half seconds. I then gradually moved the item across the paper until I reached the end; while exposing it for the same amount of time in between each movement. The end result is the effect of the item moving across the page, and overlapping itself. |
|
Sandwich print/negative to positive: For this image, I 'sandwiched' an already exposed and processed image with a new unexposed piece of photographic paper. I laid these together under a pane of glass, so that they were kept firmly together in place, and used the enlarger to expose the paper. This creates the effect of the 'negatives' turning into 'positives' as the image is effectively reversed. You are left with a positive version of the same image. |

|
|
An example of a solarized print:

|
Solarizing:
To create an image using this technique, the photographic paper is exposed like usual, once I'd arranged my items on top of it, but it is developed in a different way. Instead of leaving the paper in the developer tray, to process for 1-2 minutes, it is left in the tray for only a few seconds until the image starts to develop. Once the image begins to be seen, the paper is taken out of the tray and re-exposed under the enlarger. The paper can then be processed as usual, and the resultant effect is silvery hints and an outline around the negatives in the image. |
|
Weaving: This technique is created by using two developed contrasting images. I cut the first image into 1cm strips vertically, but left roughly half a centimeter at the end, so that the strips were still all attached. This made it easier for me to weave the second image through. I then cut the second developed image into 1cm strips horizontally, but this time all the way through so the strips were all separated. I was then able to start weaving the two sets of strips together by alternating weaving them over and then under each time. Finally, I secured the finished weaved image together with masking tape on the back. |

|
Well done- perhaps you need to get a solarised print off the internet if you didn't manage to do it.
Project 2: The Pinhole Camera -
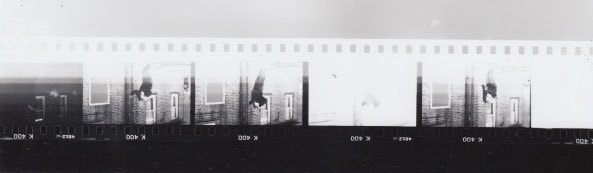
In this task, I was required to successfully make a pinhole camera, and use it to create a number of interesting images. These included: a shot from the corner of a building, a portrait, a double exposure image, and one from a window looking outwards.
What is a Pinhole camera?
A pinhole camera is the simplest form of a camera, and is based off of a camera obscura. A camera obscura is a room or container that has been blacked out, except for a small hole that lets light through. This principle is applied to the pinhole camera, where I used a large can with a pinhole in it to create my camera. When light passes into the pinhole in straight lines, they become laterally inverted, as the light touches the bottom of the camera - and the image therefore appears upside down.

How to make a Pinhole camera:
In order to make a pinhole camera, you need:
In order to make a pinhole camera, you need:
- A large beer/drinks can with the lid
- A can opener
- Black cardboard/paper
- Black electrical and gaffer tape
- A pin
My examples using the pinhole camera:
The corner of a building -
Negative version Positive version
Negative version Positive version

|

|
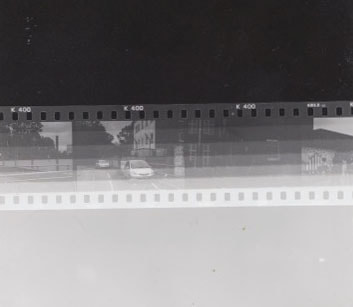
The view from a window -


A portrait -

|

|

|

|
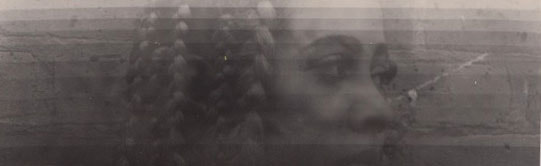
Double exposure -

|

|
Overall, I think my images in this task were successful, and I completed the tasks with some trial and error. It took some attempts to achieve the correct exposure, as some of my images were coming out overexposed or underexposed. I adjusted where I was taking my pictures, and the amount of time I exposed them for. For example, if I was in a brighter area outside in the sun, I had to expose the pinhole for less time. I found that 2 or 3 seconds worked well for this. I also had to consider how far I stood from my subject, and the angle I held my camera at; as I obviously couldn't see inside the camera. Again, this was just trial and error as some images didn't come out as I wanted them to. I think I made my pinhole camera successfully, as it was light tight and I was able to produce the images I wanted to. Another problem I faced was accidentally leaving marks on my images from the tongs during the developing process. You can see this in my portrait images; however once I had fully developed them I was more careful while handling my next lot of images to avoid damaging them. I do now have a better understanding of the exposure timings needed for different lighting conditions, which helped me in the next task when using photographic film.
I was happy with how my final images came out, and once I had scanned them onto my computer and created the positive versions on photoshop, they were a lot clearer. I was also able to crop out any empty space which was a result of not being able to see exactly what I was photographing. It was also sometimes difficult to create clear images with a good contrast, but editing them on photoshop definitely helped with this - as I could adjust the sharpness and contrast digitally to improve my final images.
Annotate, www and ebi. Consider how light tight you made your camera, how difficult / easy did you find creating a clear image that had contrast? Did you have to adapt your technique to achieve a better image? How did you manage the timings? Do you now have a good idea of the exposure times for different lighting conditions?
Btw- You haven't said how you created your positive images. (sandwich print)
Project 3: The SLR camera -
|
What does SLR stand for?
SLR stands for single lens reflex - which refers to the way this type of camera works. Unlike digital cameras, this type uses rolls of film to capture images. The back of the camera is opened, and the roll of film is slotted into it. Before taking a photo, you have to set the aperture and shutter speed to determine how much and for how long you want your film to be exposed for. So, when you are ready to take a photo and look through the viewfinder, light passes through the lens and bounces off a diagonally placed mirror, into your eye. Then, when you press the shutter release button, the shutter opens, allowing the film at the back of the camera to be exposed to the light. Once light hits the film, a chemical reaction starts and the silver halide starts to form an image. The film can then be processed for the image to be developed. |

|

|
What is the Exposure Triangle? The exposure triangle consists of three variables that adjust how a camera captures light. These are the aperture, ISO and shutter speed. Together, these three elements allow a shot to be properly exposed; and are all dependent on each other do do so. What is Shutter speed? The shutter speed controls the speed at which the lens opens and closes to allow light into the camera. What is the Aperture? This is the section of the camera that can be adjusted to let in more or less light, depending on how exposed you want your images to be. What is ISO/ASA? This is effectively the camera's sensitivity to light. The higher the ISO, the higher the sensitivity and exposure. |
My first film - intentions of the task:
In this task, my intentions were to successfully create my first film, and experiment with exposure and shutter speed whilst doing so. The first part of the task was to take close up portraits of my partner, using a fixed shutter speed. This was 1/125 of a second, while I changed my aperture repeatedly. I used every second F stop on my camera - so f4, f6, f8 etc - until f16. I used a plain background to eliminate unneeded noise and objects in my images, and avoided direct sunlight as this creates shadows and overexposure. For the next part of the task, I had to photograph my partner while they moved. This time the aperture was fixed at f8, while I changed the shutter speed throughout. Again I used every other shutter speed, and started at 2 seconds, gradually increasing the speed. We took the same measures and photographed with a plain background and indirect sunlight.
In this task, my intentions were to successfully create my first film, and experiment with exposure and shutter speed whilst doing so. The first part of the task was to take close up portraits of my partner, using a fixed shutter speed. This was 1/125 of a second, while I changed my aperture repeatedly. I used every second F stop on my camera - so f4, f6, f8 etc - until f16. I used a plain background to eliminate unneeded noise and objects in my images, and avoided direct sunlight as this creates shadows and overexposure. For the next part of the task, I had to photograph my partner while they moved. This time the aperture was fixed at f8, while I changed the shutter speed throughout. Again I used every other shutter speed, and started at 2 seconds, gradually increasing the speed. We took the same measures and photographed with a plain background and indirect sunlight.

|

|

|

|
Developing my film:
To develop our film, we had to go into the darkroom in complete darkness. This is necessary because photographic film cannot be exposed to any light - even red - otherwise it is ruined. Once in the darkroom, I had to open my film cassette by using a cassette opener and bend off the lid. I then took the roll of film out of the cassette and began to unroll it. Once I had reached the end of the film, I cut off the plastic reel that was in the center of the roll of film. Next, I had to load my film onto a larger reel that fits into the developing tank. I had to find the slots on the side of the reel that the film fits into, and feed my roll of film into it. Once my film had started to slot in, I was able to twist either side of the reel back and forth to wind the rest of my film round it. Once all of my film was wrapped around the reel, I could put the center core into the middle, and put it into the bottom of the developer tank. I then put the light proof cover over the tank and twisted it into place; followed by the water tight lid. Now that my film was securely in the tank, I could turn on the lights.
Then, the film has to be processed with chemicals so it can develop. I mixed 300 ml of developer with an equal amount of water in a measuring jug, and removed the water tight lid from my tank. This mixture is then poured this through a funnel and through the light proof cover into the tank. The developer then takes 7 minutes to work, and I had to agitate it every 30 seconds by flipping the tank upside down, so that the chemicals could wash over my film. Next, the developer was drained from the tank, and the stop chemical is poured in. This chemical was the same amount as the developer. I then had to agitate this for 30 seconds in the tank. The final chemical we had to use was the fixer. Once the stop chemical was drained, the fix was added and agitated for another 5 minutes. Lastly, the fix is drained from the tank, and the tank is left under a tap so that it can fill with water to rinse off any excess. Lastly, once the film is rinsed, it can be unrolled and hung out vertically to dry in the drying cupboard. Once dry, I cut my film into strips of 6 images, and slotted them into a neg holder so I could then make my contact sheet.

|

|
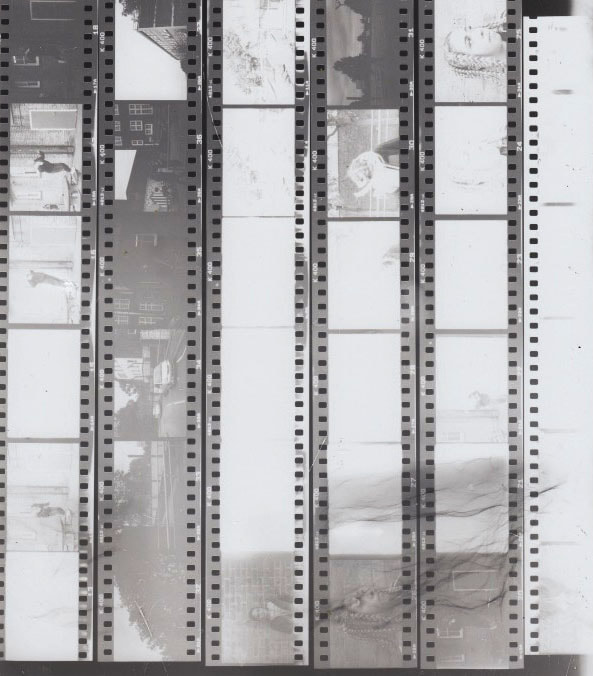
Contact Sheets:
The purpose of a contact sheet is to present positive prints of all of the images from a roll of film. This helps the photographer chose the best images to enlarge, instead of wasting time enlarging more than they need to. It also ensure none of the film is lost or misplaced, as they are all printed on to one sheet of photographic paper.
To create a contact sheet, I first had to make a test strip. This is made in the darkroom by choosing a strip of film that has clear images, and placing it on top of a strip of photographic paper, under the enlarger. I then used a 1 second timer on the enlarger, and moved the black card horizontally backwards across my strip of film, a few millimeters each time until I reached the end of the strip. The result was a positive print/photogram of my strip of film. This created a test strip as each section of the photographic paper had been exposed for 1-7 seconds. I could then chose the best exposure time and use that to make my contact sheet.
|
|
Next, once I was ready to make my contact sheet, I placed all of my strips of film onto a larger piece of photographic paper; and put a square piece of glass over the top, to weigh down the film and ensure it didn't move. I set the timer to my chosen exposure time and exposed the paper, creating a contact sheet of all my images. I could then choose the best images to enlarge.
Next, once I was ready to make my contact sheet, I placed all of my strips of film onto a larger piece of photographic paper; and put a square piece of glass over the top, to weigh down the film and ensure it didn't move. I set the timer to my chosen exposure time and exposed the paper, creating a contact sheet of all my images. I could then choose the best images to enlarge.

|
|
The Printing Process:
Once my contact sheet was printed, I could choose the best images to print and enlarge. To do this, I first removed the negative carrier drawer, and slotted my chosen image into it. I had to slide my film along, as there are six images on each strip, to get the image I wanted in place with the square hole. I then slotted the negative carrier drawer back into place in the enlarger, and turned the focus control, to make sure my image was clear. Next, I made sure the red safelight filter was in place, and the put my sheet of photographic paper in place under the enlarger. I turned the height control knob to fit my image to the paper. I then could make a test strip of my image. I did this so that I could find out what exposure gave me the best result for my image. Once I had done this, I could print my final images. I placed some new photographic paper under the enlarger, and making sure the image was projected as the right size, exposed the paper using my chosen exposure time. Then, I could develop my images by putting them through the developer, stop and fix chemicals.
Some of my prints didn't come out as I wanted them to, for example, some were not fully in focus although I thought they were, and some needed to be exposed for a few seconds longer.
Foundation Assessment
Clear explanation of all processes and techniques (AO2). Outcomes also demonstrate an understanding of processing and printing film (AO2). You have a good photographic eye and create thoughtful, well-composed images (AO3). Take more care with focus and exposure when using film in the future. You need to develop more consistency in this area (AO3).
Clear explanation of all processes and techniques (AO2). Outcomes also demonstrate an understanding of processing and printing film (AO2). You have a good photographic eye and create thoughtful, well-composed images (AO3). Take more care with focus and exposure when using film in the future. You need to develop more consistency in this area (AO3).
